Posts tonen met het label WIP: GW 40K Orks. Alle posts tonen

donderdag 27 januari 2011

40K: Ork Trukk building part 3, the Engine

I personally think that the engine is quite nice. With a little effort you can change it and/or dress it up with some wiring.


Posts on this subject:

Related posts:


Exhaust piping.
First thing I wanted to do was to make one engine with the short exhaust pipes (like a racing engine) and one with the longer exhaust pipes, which end behind the cabin. I started with the short exhaust pipes so the engine would look like the photo below.
The engine with the short exhaust pipes on both sides.

To do this was fairly easy. Just cut the both outer ends, which are to be connected to the engine, exchange them and glue the parts together. I advise you to pin them together with some kind of rod. You don't have to be that accurate (otherwise you wouldn't build the Ork-way). In my case I drilled the hole of one pin-connection wrong, so the join wasn't perfectly aligned. As you can see on the photo I eliminated the problem the Orky-way by wrapping a wood-glue soaked piece of paper around it. (Later I think I'll paint it a leather colour or so). For the engine, I just drilled two holes in the side for the pins of the exhaust.
Making a pair of exhausts the easy way.
For the long piping I still haven't got a clue. But I will when I'll be able to properly test-fit the piping with the cabin in place.


The wiring.
Another easy job. I examined the engine and made the decision that it's a 6 cylinder multi-million Hp engine (I'll take the red paintjob). As the spark plugs on such an engine need some serious electrical current, the wiring should be thicker than the rest of the wiring. In elderly cars the spark-plug wiring came from a coil....there are two things that can resemble a coil, but they are on the wrong place for some proper wiring. So I took some plastic sprue, drilled some holes in it and glued it on the end of the engine and named it "coil". Now I could properly contruct the spark-plug wiring.

As I feel the spark-plug wiring makes the engine better-looking, I wanted to really connect the engine to its other parts and to the cabin. So I drilled some holes where I thought it would be appropriate and wired it together.
One important thing was the booster pressure cylinder. It needed to be electrical connected to open the valves (otherwise I would need to model a Grot mechanic to open the valves when needed).
The other important thing was to connect the engine to the cabin. I kept two wires disconnected and bend them to fit between the cabin wall and the cockpit.

Below some photos of the result of the wiring.

Note: The thick wiring on the photo's I purchased in a Model Train shop, for the thin wiring I scavenged the broken down electrical toys at my loft.


The engine is connected to the cabin.


Until next post :)

maandag 12 juli 2010

40K: Ork Trukk building part 2, the Chassis

I won't go through the part explaining that one should cut out parts and remove the mouldlines.
I won't glue all of the kit together. I want to create sub-assemblies that I can paint with ease. After the painting I'll glue the sub-assemblies together and then finish the kits with details, weathering etc.


Posts on this subject:

Related posts:


First I assembled the axles and shafts, except for the one from the engine. I also assembled the fuel tank. Nothing special yet.
Chassis and axles assembled


Test fitting the wheels. This is the first reason to buy two kits. By swapping some of the wheels there is already an individualistic look of the vehicles, the easiest 'conversion' you can make. I didn't glue the wheels on to the axles for painting purposes.
Wheel swapping


Next step was to test-fit the engine, cabin and flatbed (deck). The cabin didn't fit properly, on one side it didn't rest on the chassis, but on one of the straps holding the fuel tank (see image below).
The cabin rests on the fuel tank instead of the chassis (the problem location is circled)


The solution is to remove the rivets on the underside of the cabin (see the circled part in the image), and to file down the top of the strap holding the fuel tank until the cabin fits (less then 1mm). You cannot see anything of the filing after assembling the cabin.
Rivets removed and fuel tank strap filed down (both encircled)


It felt like there were some parts missing on the fuel tank, a fill cap for instance. I made one from the shaft of a choppa. I also made a fuel line from electrical wire (normally used for train modelling).
Added fill cap and fuel line for the fuel tank

Looks ok !


That was the chassis, I will still have to smooth out the moldlines, glued edges and irregularities, but the basic work is done.

Next part will be the building and dress-up of the engine.

zondag 4 juli 2010

40K: Ork Trukk building part 1, introduction

I have purchased my Ork Trukks in 2009. Articles in the white Dwarf on 01-2009 made me like the new Trukks, so I went and bought two (they have been 'resting' until a month ago)


Posts on this subject:

Related posts:


Well, first we'll take a look what's in the box and what you can do with it.

Product description by GW in the White Dwarf  on 01-2009 (you know, Janu-waaagh!-ry);
"This incredible multi-part plastic kit contains 1 Ork Trukk, and includes a bolt-on big shoota, rokkit launcha, boarding plank, wrecker ball and reinforced ram.".

As I opended the boxes I found out that one of the items I wanted to use was missing; the rokkit launcha.
So I got to the GW-site to check it and there was another product description:
"This box set contains one multi-part plastic Ork Trukk, and includes a bolt-on big shoota, boarding plank, wrecker ball and reinforced ram.".

So that was it, certainly no rokkit launcha. Didn't they knew this in January ? The box set was already out then ! Now I have to wait for the Forge World parts or make them myself from bits. A bit of a dissapointment.

Let's see which options from the codex you can make from the kit:

  • Big shoota.............................................Yes
  • Rokkit Launcha......................................No (why ?)
  • Red paint Job.........................................n/a (only if you have red paint)
  • Grot riggers...........................................No
  • Stikkbomb chukka.................................Yes (there is one chukka include in the kit)
  • Armour plates........................................Yes
  • Boarding plank.......................................Yes (two)
  • Wreckin' ball..........................................Yes
  • Reinforced ram......................................Yes

Next, GW states on the website;
"The Ork Trukk sprue allows you to build a single fighting vehicle that you can kustomize as you see fit with all the cool extra bitz.".
Let's see what would be left on the frame left when you had build the standard kit (with the options shown above).
Well, 5 glyph plates. On the pictures they are the square plates shown on the left frame.

Here are the frames. (My frames were already used, so I have used pictures from Librarium online).


You may think the kit isn't much, because of only two frames and more promises than delivery, but I think the contrary is true. I think it's one of the best kits from GW yet. I like it more than the Battlewagon or any other GW kits I own (and I own a lot).

However I do think it's a shame that there's no rokkit launcha on the frame. When you're getting kits from the Space Marines or Imperial Guard, GW almost kills you with the amount of missile launchers in the kits. And with the Orks, rokkit launcha's are very scarce, and badly needed because the Orks have very few long range anti-tank.

If you like them, you should buy at least buy two of these kits, because then you can easily make two individual or different Trukks. I'll buy another two, because I want to pimp one of my Battlewagons and the Trukk has almost all the parts to do the trick. Furthermore, I want to make one with traks.

If you like warbuggies, the Trukk is also the place to be, with two Trukks, you could make 3 buggies (but that's another story).


Value for money ?
As the prices have gone up lately, i have heard many talking about the value for money for the GW products.
At the time I bought this kit, the price was £18.00 and now it is £20.00.
When you compare it to other plastic manufacterers, it is very expensive. But if you compare it to other kits for GW, I believe you get more building pleasure with this kit for less money than many other, evenly or higher priced GW kits.
The bottom line is, I like this kit, so I'll buy it.

Next part I will start with the actual assembly.

dinsdag 29 juni 2010

40K: Orks WIP part 2, some pictures

Ah, I made some photo's (well, it were some quick shot's, hope you like them)


HQ
No models made yet, nor decided which models to use.

Elites
Nobz
Well, I plainly assembled some Nobz out of the Black Reach box. I still don't know what I'm going to do with the rest.
Nobz on mixed bases

Burna Boyz
I like the Burna Boyz, especially for the fluff (background). I like the story about these arconists, making even other Orks doing 'da burny dance'. The models do not fit very well. According to the GW site, you can twist  the straps, but I don't like to do that. I will make a unit of about 15 Burna's including 2 Mek's.
Burna Boyz on tech scrap bases

Tankbusta's
There are 4 tankbusta's and one Nob in the box. I haven't got a clue why GW have done this, if you want more tankbusta's, you'll get 4 usable tankbusta's an 1 unusable Nob, certainly no value for money.
I haven't assembled them yet. I'll make the other tankbusta's with some Bits and Forge World parts. No pictures yet.

Loota's
As I have got enough Loota parts, I am thinking about making some, but haven't decided yet. No pictures.

Kommando's
Well, it's the same story as the tankbusta's. No pictures yet.


Troops
Da Choppa Boyz.
I will start with the boyz out of the Black Reach box. I haven't made changes to them, I only tried to keep them all different by varying the pose, heads and arms. The assembly is very straightforward.
I'm making 3 basic units of 20 Orks (18 shown as the heavy weapons aren't build yet). 1 unit will have blue arm bandages with Tyranid bases, 1 unit will have another colour arm bandages with technical scrap bases and 1 unit will have an equal mix of blue and other arm bandages with plain bases. that way I can choose to make 3 untis of 20 (by the different bases) or 2 units of 30 (by the coloured arm bandages)
Boyz with Tyranid bases

Boyz with Tech scrap bases

Boyz with plain bases

Da Shoota Boyz.
Here again some Boyz, but this time out of the battalion box. I also didn't made much changes to them. It will become a unit of about 20-30 shoota boyz.
Shoota Boyz with tech scrap bases

Very 'Ard Boyz (Hur Hur).
I have used the Warhammer Fantasy Black Orcs as 'Ard Boyz. I think they will stand out more than the 'normal' Boyz with some armour plates glued on. I had to make some seriuos changes, especially the helmeted heads (which are huge). I have given them slugga's and some will get 'normal' heads. The poses of the Black Orcs doesn't make them ideal conversion material, but it will do. The unit will be 20 boyz strong including 1 Nob.
'Ard Boyz with plain bases

Gretchin
I like these little critters. I've assembled only 3 of them, but I would like to share the picture.
I will make a unit of 20 Gretching with 2 Runtherds.
Gretchin on tech scrap bases

Trukk's
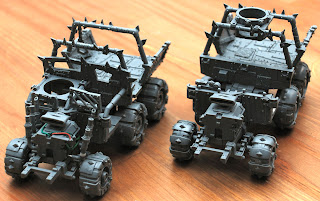
These belong to the most likable models that GW has made.Altough they have some serious assembly problems, small conversions are quick to make. I would suggest that you buy them per 2, because you can easily swap some parts and make them unique. I will make another thread in which I'll show what I did and do with these vehicles. Here are some 'teasers'.

Ramshackle Trukk's


Fast attack
Deffkopta's.
The models are very nice, but they do not have many easy ways of making them unique. Therefore I have tried to make the bases somewhat unique. I have assembled only 3 until I have decided how to make the rest. I certainly want to make some with shoota's instead of rokkit launcha's.
Defkkopta's maneuvring

Heavy support
Battlewagons
I have started to assemble a battlewagon, but I stopped. The kit is too bare. I want to see the interior of the cab. I want to see engine workings. I need to buy a Trukk for parts making the Battlewagon look really good.
I will make 1 plain wagon and 1 showcase model. I have to let it rest until another Trukk arrives.
Battlewagon waiting for parts


Well, that was it for now. Hope to post some progress soon.

40K: Orks WIP part 1, the stock

It's time for the WIP (Work In Progress) Orks to be shown. I'm creating an army that is supposed to look good instead of being very hard.


I've purchased in the last year a small army and started in my vacation some serious building. So what have I got is this:

  • 1x Codex Orks
  • 2x boxed set Assault on Black Reach, where I have traded one set of Marines for Orks. That would make a total of:
    60 Boyz with choppa and slugga
    15 Nobz
    3 Warbosses
    9 Deffkopta's
  • 1x Battalion box, containing
    20 Boyz (various options)
    3 Warbikes
    1 Trukk
  • 2x Black Orcs (Warhammer Fantasy) (To become 'ard Boyz, because the normal 'ard boy parts are scarce, they don's stand out and, most important, they will hopefully look good !)
  • 4x Loota's and Burna's box, with a total of
    16 Loota or Burna boyz
    4 Mek's
  • 1x Kommando's box
    4 kommando's
    1 Nob
  • 1x Tankbusta box
    4 tankbusta's
    1 Nob
  • 2x Gretchin box
    20 Gretchin
    2 Runtherds
  • 1x Trukk box
  • 2x Battlewagon box with 1 additional upgrade pack.
  • 1x Gretchin crew (Forge World)
  • 1 Ork Bot with Gretchin controller (Forge World)
To be added (purchased):
  • 1x Battalion box.(for Bits and Bikes)
  • 1x Trukk (because its a cool model)
  • 1x Grot tanks (Forge World) (because they are really cool models)
  • 2x Ork Rokkit Launcha's (Forge World) (because Gw doesn't include enough in the kit's)
  • 1x Ork weapon set (because I like it)
That would be enough for a small army.
I think the Orks are very well suited for some conversion projects. Certainly the Trukk is a great kit for both conversions and bits.

In the next part I will show some photo's of the current status.