Normally we play a (miniatures) game every month. But to avoid making it a monthly routine, we decided last year to have a day out once in a while instead of a game.
Last year we did historical, the Varus battle, or battle at the Teutoburgers forest, in Germany where three roman legions (17th, 18th and 19th) 'disappeared' in 9 ad.
This year the day out would be WW1 or the Great War in Belgium.
Posts on this subject:
Event: Happy day out, WWI Ypres/Ieper Part 1
Event: Happy day out, WWI Ypres/Ieper Part 2
The trip was last sunday (4 july 2010). I went with a couple of friends (maybe you recognise most of them from the Salute event). Here a list of our group.
- Umfufu, the butt-naked Zebra killer
- Janus, a stranded alien, hitchhiking from Venus to Uranus
- Bokito, the double-action lapdancer
- 'Nee hoor !" Endie-pendie
- 'The Amish'
Who's who on the pictures is for you to guess and for me to know :)
A brief introduction to Ypres:
Ypres was one of the battlefields of WW1, there were three major battles;
On these fields some 500.000 to a million soldiers were wounded or died, and who knows how many civilians.
As the drive to Ypres would be about 2,5 hours, we agreed to leave quite early. The time was set at 07:30, but one of the group was late (the bastard, he should be flogged). We finally left at 08:30.
The first visit would be to the Ypres Cloth halls, which houses the In Flanders Fields museum.
The route to Ypres
Because the group consisted of 5 people, it wouldn't fit in the Mini, so we drove with two cars. One new and one classic Mini :)
Assembly at 8:30
About 10:30 it was time for a stop...err...second breakfast. The Belgian restaurant offered an english breakfast (well, something like an english breakfast, but without the mushrooms, scrambled eggs, beans and toast...)
The restaurant
The 'english breakfast' is yet to arrive
Finally at 12:30 we arrived at the Cloth halls, from which I took a nice picture, later this week I found a photo of the cloth halls in WW1 (below). Quite something different.
The cloth halls, In Flanders Fields museum
The building on the right side is the Cloth halls,
look for comparison to the small tower on the corner.
(photo from Wikipedia)
The scale of the devastation of Ypres
(photo from Wikipedia)
In the halls there was an exhibition about the hundreds of thousends chinese workers, who were brought to Belgium to labour for the War effort. They didn't get what was promised (except for the labour). Some made art-work from the shell-casings to make some money.
Some stuff the chinese laboured
Shell-casings with art engravings
After the exhibition we went to the museum, which had an impressive entrance. We also got a card, with which you could follow the personal story of someone who was there in WW1. Sadly the story was factual (only places and times) and the timline consisted of only three terminals. There were a lot of personal stories in writing and some were quite thrilling.
I took a lot of pictures, below are a few of them. If you want to see more, you should visit the museum.
Entrance
Various material
Various material II
Machine gun
Shell casings
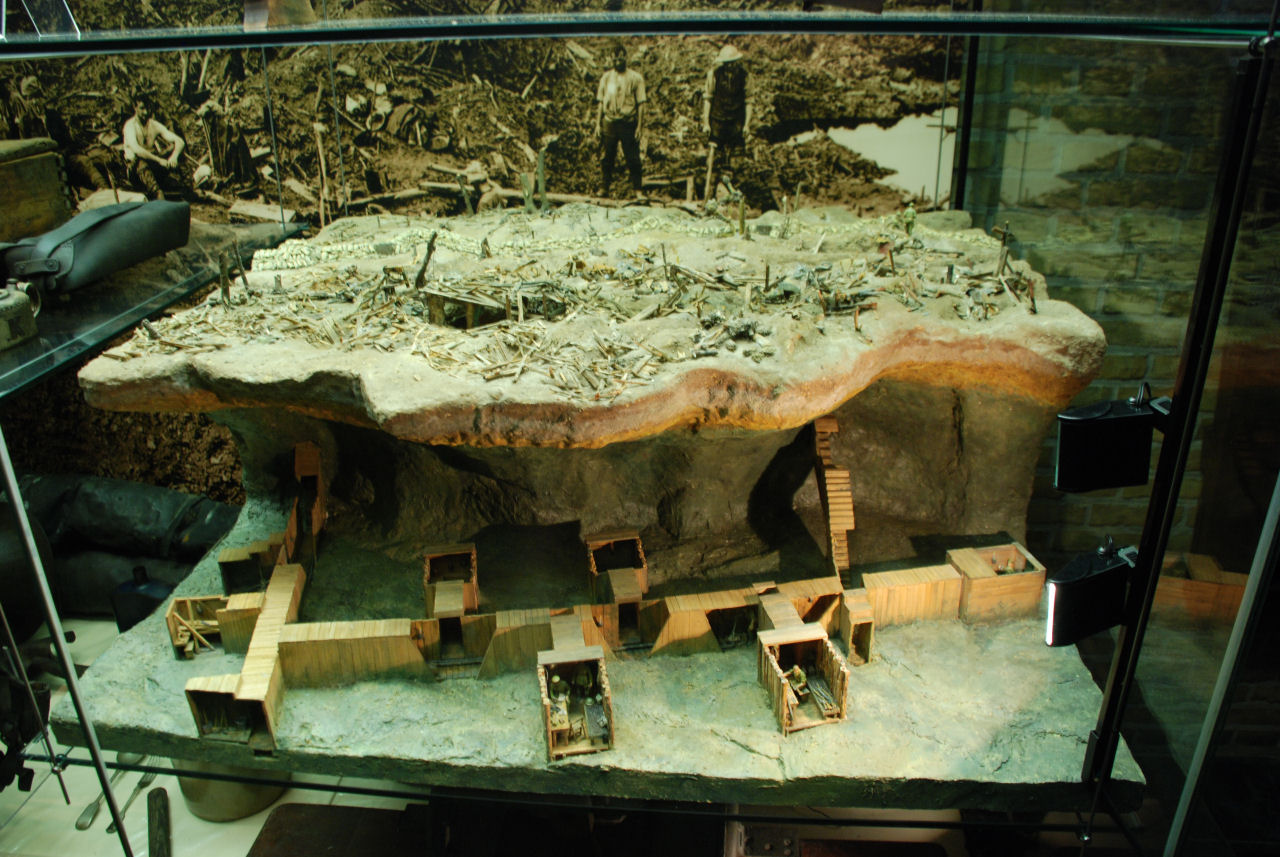
Diorama, left side
Diorama, right side
Diorama of a dugout at the front (in reality some 10 metres below ground)
Around 14:00 we were finished in the museum and quite in for a 'bite'. Next to the Cloth halls there were some nice little restaurants which hopefully could serve us well.
The place where we ate a snack (in the red circle)
All the guys
After the feeding, one of the guys had to do his Jiggly Dance, arousing a lot of people (men and women) on the square (sometimes with desastrous results).
The Jiggly Dance
One that's got aroused.
A boner with too little room in the pants results in peculiar facial expressions
The only edible remains after the feeding....chocolate sauce.
For the next stage of our visit to the battle fields, we discussed where to go. So I went back to the museum to get a map. I left my camera on the table, so in the mean time the guys made some interesing pictures of the rebuilded Ypres centre, the Belgian architecture and the layout of the town.
Rebuild Belgian architecture etc.
Finally we decided to go to Passchendaele, where to largest battle took place. Around 15:30 we left Ypres and headed for Passchendaele. When entering or leaving Ypres we came trough the Menin Gate Memorial to the Missing, a very impressive sight.
Menin Gate Memorial to the Missing
Well that's it for now. Passchendaele will be continued in part 2.